If you're a daily computer user then you would have needed a solution to somehow record your computer's screen. Though there is an inbuilt screen recorder available on your windows machine, it is not sufficient for too long recordings, and on some machines, it doesn't even work correctly.
But still, if someone doesn't want to install any additional software on their machine they can try the inbuilt screen recorder on Windows OS.
To use your inbuilt Windows Screen recorder follow the below steps :
- First, you've to enable the inbuilt screen recorder.
- To do that Go to your settings or just press the Win + I button.
- Then click on the Gaming Option.
- On the Xbox Game Bar page, you'll see a radio button to enable the Xbox Game Bar for recording. Turn it on.
- On the same page, you'll see a keyboard shortcut section, you can see the shortcut to start/stop recording which you edit and set your custom shortcut to start the recording.
- Now, to start the recording just press Win + alt + R to start the recording.
- You'll see a small pop-up on your screen which displays the timer.
- To stop the recording again press the Win + alt + R. It will stop and save the recording on this location "C:\Users\username\Videos\Captures".
Now if you're a content creator on social media then you might have to professionally record your screen without any watermark. And besides recording, if you also want to do live streaming then in spite of using the in-built screen recorder you should use a professional screen recorder like OBS.
Now, what the hell is this OBS?
OBS (Open Broadcaster Software) Studio is a free, open-source, and cross-platform screen recording and streaming software. It is available for Windows, macOS, and Linux distributions.
To use OBS, you need to download and install it on your computer system.
Click the link to Download OBS.
Now choose your OS (Windows, macOS, and Linux) and click on it to begin the download.
Now click on the downloaded file and install it => No Rocket Science.
Now when you open it for the first time don't get scared of its dark look. Trust me it's tremendously easy to use it.
How to start the recording in OBS?
- There is a Sources panel.
- Now click on the add (+) button to add the source.
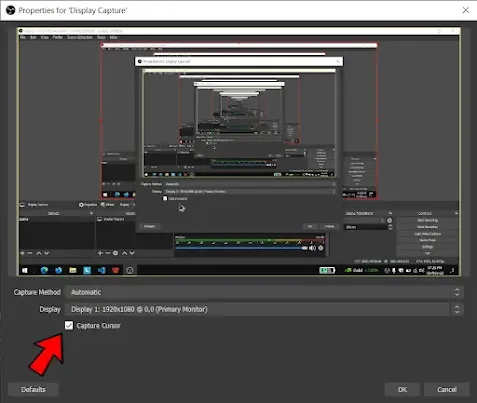
- For now, I'm adding the Display Capture source to record my entire computer screen
- When you click on Display Capture source you'll see a small window named Properties for 'Display Capture'. Here don't forget to click on the Capture Cursor checkbox if you also want to record your mouse cursor.
- Now in the bottom right corner click on Start Recording.
- As soon as you click on the button it will start recording your screen.
- To stop the recording just click on the Stop Recording button and your recording will be saved in your C drive.
- Now to access your saved recordings just click on the File option in the menu bar.
- A drop down menu will appear then just click on Show Recordings.
- By default, it is saved at this(C:\Users\username\Videos) location in Windows OS.
Now though there is much more to tell about OBS, but this is a very basic article about screen recording.
I hope this article proved helpful for you. If you've any queries related to this article please do comment on it.


